Thursday, December 1, 2022

Controlling SCCM bandwidth Utilization


There are four items that control network bandwidth utilization within SCCM: 

  1. BITS client setting – The download of data from the distribution point to the client is a BITS download.  In the client settings of the clients the rate of those downloads can be adjusted.  However, this is client side and does not know about bandwidth on the network so if enough clients, even if all configured to 1Mbps, are trying to download at the same time it can still clog the WAN.
    https://learn.microsoft.com/en-us/mem/configmgr/core/clients/deploy/about-client-settings#background-intelligent-transfer-service-bits

    I recommend setting the BITS settings but to something that will work for your organization.  Exactly what that is varies greatly from one organization to another.

    Client Settings items for BITS


  2. Rate Limit Schedules –  Set in the Distribution Point properties, this controls maximum data that can be sent to each distribution point  at any given time of day.  This is to prevent WAN saturation while getting the data onto the distribution points prior to deployment to clients.
    https://learn.microsoft.com/en-us/mem/configmgr/core/plan-design/hierarchy/manage-network-bandwidth#BKMK_PlanningForThrottling

    I recommend setting the rate limits but to something that will work for your organization.  Exactly what that is varies greatly from one organization to another.  Remember that this is set individually for each distribution point.

    Distribution Point properties setting for Rate Limits


  1. LEDBAT - Where BITS worked client side, LEDBAT works server side to control bandwidth usage.  Like the throttling rate limits it is enabled on each distribution point individually.  The idea is that it dynamically adjusts transfer rates so that clients only use network bandwidth when it's available.
    https://learn.microsoft.com/en-us/mem/configmgr/core/plan-design/hierarchy/fundamental-concepts-for-content-management#windows-ledbat

    I recommend turning this on for every distribution point.

    Distribution Point properties setting for LEDBAT

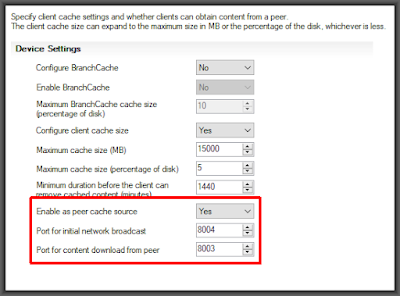
  1. Peer caching technologies – Peer caching takes at least a portion of the load off of the WAN by allowing clients to share cached deployment data with each other.  We would limit this to only peers that are on the same subnet in order to ensure that they are never going cross-WAN. There are three peer caching technologies available in SCCM.  Without going deep on all of them I will just say that the on I recommend using is “Peer cache” for on-premises and Delivery Optimization for cloud (Intune).  Yes, use both if you have both on-prem SCCM and Intune because Delivery Optimization gives no benefit to your Line-of-Business applications or anything else that is not delivered from Microsoft's global distribution network.
    https://learn.microsoft.com/en-us/mem/configmgr/core/plan-design/hierarchy/fundamental-concepts-for-content-management#peer-caching-technologies

    I suggest turning on Peer Cache for all non-VPN connected clients and enabling peer downloads, but limited to same subnet, on all non-VPN boundary groups.

    Client Settings items for Peer Cache

    Boundary Group Setting for Peer Cache


Export all Scheduled Tasks

Unfortunately I've not yet figured out how to export the schedule itself, but for everything else run an elevated Powershell and: 


$outcsv = "C:\Users\$env:USERNAME\desktop\taskdef.csv"
Get-ScheduledTask |
ForEach-Object { [pscustomobject]@{
Name = $_.TaskName
Path = $_.TaskPath
User = $_.Principal.UserID
LastResult = $(($_ | Get-ScheduledTaskInfo).LastTaskResult)
NextRun = $(($_ | Get-ScheduledTaskInfo).NextRunTime)
Status = $_.State
Command = $_.Actions.execute
Arguments = $_.Actions.Arguments }} |
Export-Csv -Path $outcsv -NoTypeInformation

Friday, March 25, 2022

Get Number of Days since last Windows Udpate was applied

In order to pre-emptively identify computers that are not getting software updates you might want to know how long it has been since they last applied a Windows Update.  Here you go:

$TimeNow = Get-Date
$LastSUInstall = ((Get-WmiObject -Class win32_quickfixengineering -Namespace root\cimv2).InstalledOn | sort -Descending)[0]
[Int]$OutputInt = ($TimeNow.Subtract($LastSUInstall)).Days
Write-Output $OutputInt

Wednesday, February 2, 2022

Why using Windows Hello is less secure than not using it

Let's try a thought experiment...

You are guarding the gate of a castle.  That gate is the only way into the castle.  In order to enter via the gate a password is required.  When someone comes up to the gate, you challenge them, "PASSWORD!" and they respond either with the correct password or not.  Based on their response you either allow them entry or you don't.  The password to every royal estate is the same, so any noble-person that knows the password can enter every royal estate.

Some bandits got ahold of the password and began raiding the royal estates.  In response the king changed the password and then in order to increase security even further he had his masons put a hole in the castle wall and install another gate.  He placed another guard at the new gate and this guard was told to require a slip of paper, signed by the king, be presented to allow entry... a "certificate of entry".  The certificate only works at the one castle/computer, unlike the password which the king uses at every one of his estates.  

The king did not get rid of your gate, people can still enter using the (now changed) password but they can also enter through the other gate by presenting their certificate of entry.

Now... was the castle more secure when it only had one entry point or is it more secure now that it has two?  Obviously one entry point is more secure than two, but the king is hoping that using the certificates of entry will keep the bandits from plundering his other holdings as well.  If the bandits got ahold of a certificate of entry they can enter the castle and plunder it, but they cannot enter other royal estates.  That's good, it is keeping the other estates secure.  

So, soon the bandits did just that.  They intercepted a nobleman, stole his certificate of entry into the castle.  Once inside the castle, being smarter than the king had given them credit for, the bandits hid out near your gate and listened for the password.  They then ran amock plundering all of the estates again AND stealing more certificates of entry to those other locations as well.

Just like the second gate at our imaginary castle, Windows Hello opens up a second gate to any computer upon which it is used.  So, each and every one of those computers is less secure.  Just like the certificate of entry to our castle once Windows Hello is breached it can be reused to access that computer.

Now, unlike our imaginary castle, Windows Hello actually presents two gates itself; the PIN, or click-on-pic, or biometric that is used for the user interface and the certificate that is actually passed from the computer to the network.  This allows for two distinct avenues of attack.  If an attacker gets that certificate then they can replay it infinitely (because you cannot change it as the user) to access the network from that computer (not from just any computer, but who cares at that point).  The attacker could obviously get ahold of the PIN or Click-On-Pic combination just like normal shoulder surfing for passwords.  But the scariest of all is if the attacker subverts the biometrics.  Good luck changing your fingerprints or IR signature should an attacker be able to duplicate them.

Your password can always be used as a back up to Windows Hello.  So, Windows Hello is really just opening another hole in the wall.  If the attacker does get inside through Windows Hello, it is much easier to get the password from the inside than it is from outside.  Your password is stored (encrypted) on the device even if you are using Windows Hello and there is also a high probability that you will need to provide your password at some other gate and it can be intercepted when you do so.

That, my friends, is why using Windows Hello is less secure than not using Windows Hello.

Wednesday, November 17, 2021

DISM Servicing Script


This was born of my need to remove OneDrive from annoying everyone into installing it.  My client will soon be turning on OneDrive for Business, so the default OneDrive needed to be removed from the image.  I also found that I couldn't install one of their pieces of financial software because .NET 3.5 was not enabled and, though I could just enable it with a one-liner in the task sequence, I thought it would be nice if their image just had that turned on.  I also thought that it would be nice to have CMTrace.exe available on every PC in my environment.

Finally (and the part the prompted me into actually scripting the whole thing) I found it annoyingly difficult to change the default user's theme, including the lock screen, without a GPO.  The issue is that Trusted Installer service protects the area where the themes are stored, so if the machine is online you have to take ownership of the files which subverts the Trusted Installer.  I wanted to have my theme work but also have Trusted Installer work.  You can do this with SysPrep but I decided to do some offline manipulation of the image because I wanted to practice my "DISM-FU".

So, here it is.  The script mounts the WIM, enables .NET 3.5, copies in the wallpaper and .theme files for the theme, sets a registry item in HKU\.default's RunOnce to run the theme thus setting it active on a user's first logon, sets the lock screen registry items, and finally rips out OneDriveSetup.exe itself and the call to run it from HKU\.default.

SourceWIM = the location of your WIM file that you want to edit
FeaturesSource = the "sources" folder from your original Windows 10 media
WallpaperSource = the network location where you have stored the wallpaper you want to use
LockScreenSource = the file name within WallpaperSource to use as the lock screen
CMTraceSource = network location of CMTrace to copy into the WIM
LogFile = Where you would like this script to spit out its log file

I often comment out the unmount line at the end so that I can make adjustments if I want to after the .bat file runs.

Here it is, enjoy

MD C:\DISMTemp

DISM /Mount-wim /WimFile:"\\server.domain.com\OperatingSystemDeployment\OS Images\Win10v20H2\Win10v20H2\Win10v20H2.WIM" /index:1 /MountDir:C:\DISMTemp

DISM /Image:C:\DISMTemp /Enable-Feature /FeatureName:NetFx3 /All /LimitAccess /Source:"\\server.domain.com\OperatingSystemDeployment\OS Images\Win10v20H2\sources"


COPY "\\server\ApplicationManagement\_Scripts\ManageTheme\Company*.themepack" "C:\DISMTemp\Windows\SysWOW64\Resources\Themes\*.*"

COPY "\\server\ApplicationManagement\_Scripts\ManageTheme\LockScreen_Company.jpg" "C:\DISMTemp\Windows\SysWOW64\Resources\Themes\*.*"

COPY "\\server\ClientTools\ConfigMgr 2012 Toolkit R2\ClientTools\CMTrace.exe" "C:\DISMTemp\Windows\System32"


REG.EXE load HKLM\DISMHKLMSoftware C:\DISMTemp\Windows\System32\config\software

REG.EXE load HKLM\DISMHKUD C:\DISMTemp\Windows\System32\config\DEFAULT


REG.EXE add "HKLM\DISMHKLMSoftware\Microsoft\Windows\CurrentVersion\Themes" /v "InstallTheme" /t REG_SZ /d "%systemroot%\Resources\Themes\Company.themepack" /f

REG.EXE add "HKLM\DISMHKLMSoftware\Policies\Microsoft\Windows\Personalization" /v “LockScreenImage” /t REG_SZ /d ”%systemroot%\Resources\Themes\Lockscreen_Company.jpg” /f

REG.EXE add "HKLM\DISMHKLMSoftware\WOW6432Node\Microsoft\Windows\CurrentVersion\Themes" /v "InstallTheme" /t REG_SZ /d "%systemroot%\Resources\Themes\Company.themepack" /f

REG.EXE add "HKLM\DISMHKLMSoftware\WOW6432Node\Microsoft\Windows\Personalization" /v “LockScreenImage” /t REG_SZ /d ”%systemroot%\Resources\Themes\Lockscreen_Company.jpg” /f


REG.EXE add "HKLM\DISMHKUD\Software\Microsoft\Windows\CurrentVersion\Themes" /v "InstallTheme" /t REG_EXPAND_SZ /d "%systemroot%\Resources\Themes\Company.themepack" /f


REG.EXE unload HKLM\DISMHKLMSoftware

REG.EXE unload HKLM\DISMHKUD


REM DISM /UnMount-WIM /MountDir:C:\DISMTemp /discard

REM DISM /UnMount-WIM /MountDir:C:\DISMTemp /commit 

Extract Specific Edition Wim from Multiple Edition Wim

 Extract Specific Edition Wim from Multiple Edition Wim

  1. Mount the ISO, locate the drive and navigate to find the location of install.wim (drive:\sources\install.wim)

  2. Open PowerShell with elevated rights. Run the following command:

    Get-WindowsImage -ImagePath <drive:>\sources\install.wim

  3. We can see existing install.wim consists of following 10 Windows 10 versions:
    Windows 10 Education
    Windows 10 Education N
    Windows 10 Enterprise
    Windows 10 Enterprise N
    Windows 10 Pro
    Windows 10 Pro N
    Windows 10 Pro Education
    Windows 10 Pro Education N
    Windows 10 Pro for Workstations
    Windows 10 Pro N for Workstations

  4. Run following command to extract enterprise wim from multiple edition wim :

    Export-WindowsImage -SourceImagePath <drive:\sources\install.wim> -DestinationImagePath <drive:\folder\FileName.wim> -SourceIndex <#>


    Where -SourceImagePath is the location of original install.wim, -DestinationImagePath is where you want to save the new wim, -SourceIndex is the index number of Windows 10 version, in this case it is Enterprise edition.

    Example: Export-WindowsImage -SourceImagePath F:\sources\install.wim -DestinationImagePath C:\Win10_20H2\20H2Ent.wim -SourceIndex 3

Friday, June 18, 2021

SCOM Gateway Certificates

It took me forever to put together this definitive step-by-step on how to create the SCOM Gateway Certificates template.  There is a lot out there about the fact that you need them, how to install them, etc.  But when you need to give someone instructions on how to create the template that information is hard to come by.  These instructions are for a Microsoft CA, obviously if you are using a different Certificate Authority then it will vary but this should still have the essentials that you need.  Enjoy...

On the CA,

1. Select "Manage" under Certificate Templates

2. Select the template "Ipsec Offline request" and select duplicate template

○ Compatibility tab 

§ Leave defaults

○ General Tab

§ Set an appropriate Name (like SCOM Gateway Certrificate Template)

§ Set Validity to 2 years

§ Set Renewal period to 6 weeks

○ Request Handling tab 

§ check Allow Private Key to be exported (this is essential and very important as you will be exporting these to import on the management servers)

○ Cryptography tab

§ select "Providers Microsoft RSA SChannel Cryptographic Provider"

§ Select "Microsoft Enhanced Cryptographic Provider v 1.0"

○ Extensions tab

§ select Application Policies click edit 

§ select Client Authentication and Server Authentication

○ Security tab

§ Under Groups or user names click "Add"

§ Select the object type of "Computer"

§ Search for the management server names

§ Grant Read and Enroll permissions to the Management Servers.  This allows the management servers to auto-renew, you will still have to manually renew the gateways.  Depending upon your AD trust relationships you may be able to add the gateways as well and then they would also be able to auto-renew.  However if that sort of trust exists then you likely did not need the gateway in the first place.  But, point is, there is no harm trying to add the gateways and it may end up helping you.


Go back to the Certificate Authority Console

3. Right-click Certificate Template, select New Certificate Template to Issue

• Select the new template created in step 2


On the management server

1. Launch https://ad/certsrv (https://adservername/Certsrv) from Management Server and select Advanced certificate request

2. Select the certificate template created in step 2.

Certreq inf settings:

[NewRequest]

Subject="CN=<YOUR SERVER FQDN>"

Exportable=TRUE

KeyLength=2048

KeySpec=1

KeyUsage=0xf0

MachineKeySet=TRUE

[EnhancedKeyUsageExtension]

OID=1.3.6.1.5.5.7.3.1

OID=1.3.6.1.5.5.7.3.2