Thursday, November 14, 2024

Azure script to create test machines quickly

 Script to us in Azure to create Windows 11 test devices:


#Create Windows 11 test device

$ProjectName = "Project" #Name of what I'm working on so that I know which RG is which

$ComputerNumber = "01" #In case I need more than one computer for the same project I can increment this

$RGPrefix = "RG-Temp-" #Prefix for the resource group.  I use this to automate deletion of all of my temp resources nightly in order to avoid running up costs in Azure

$vmName = $ProjectName + $ComputerNumber


$myResourceGroup = $RGPrefix + $ProjectName #Concatonates the Prefix with the Project name to create the resource group name

$vnetName = $myResourceGroup + "-vNet" #Name for the virtual network

$subnetName = $myResourceGroup + "-subnet" #name for the subnet

$publicIpName = $myResourceGroup + "-PubIP" #name for the public IP

$nsgName = $myResourceGroup + "-netsecGroup" #name for the network security group

$nicName = $vmName + "-NIC"

$adminUser = $vmName + "Admin"

$adminPassword = $adminUser + "PW"


az group create --name $myResourceGroup --location 'Canada Central'  #create the resource group for the new test machine

az network vnet create --name $vnetName --resource-group $myResourceGroup --subnet-name $subnetName #create the public IP address for the machine

az network public-ip create --name $publicIpName --resource-group $myResourceGroup

az network nsg create --name $nsgName --resource-group $myResourceGroup #create the network security group

az network nic create --name $nicName --resource-group $myResourceGroup --vnet-name $vnetName --subnet $subnetName --public-ip-address $publicIpName --network-security-group $nsgName #create a virtual nic

az vm create --resource-group $myResourceGroup --name $vmName --image MicrosoftWindowsDesktop:Windows-11:win11-22h2-pro:latest --admin-username $adminUser --admin-password $adminPassword --nics $nicName --nsg-rule RDP #Create the VM

az network nsg rule create --resource-group $myResourceGroup --nsg-name $NsgName --name Allow-RDP --protocol Tcp --direction Inbound --priority 1000 --source-address-prefixes '*' --source-port-ranges '*' --destination-address-prefixes '*' --destination-port-ranges 3389 --access Allow #ensure RDP is allowed on the network security group


Friday, May 24, 2024

Remediate ICMP Timestamp Request Remote Date Disclosure

If your security team is sending you vulnerabilities about ICMP Timestamp Request Remote Date Disclosure, they might look like "Filter out the ICMP timestamp requests (13) and the outgoing ICMP timestamp replies (14)." Then the solution is to either create a GPO to manage a couple of firewall rules or create them locally.  Below is a quick script to create them locally:

$fwICMP13 = @{
    DisplayName = "Disable inbound ICMP timestamp requests"
    Direction = "Inbound"
    Protocol = "ICMPv4"
    ICMPType = 13
    Action = "Block"
}
$fwICMP14 = @{
    DisplayName = "Disable outbound ICMP timestamp replies"
    Direction = "Inbound"
    Protocol = "ICMPv4"
    ICMPType = 14
    Action = "Block"
}
 
New-NetFirewallRule @fwICMP13
New-NetFirewallRule @fwICMP14


Enjoy! 

Friday, May 17, 2024

Intune - Useful Entra-AD (Azure AD) Group Dynamic Queries

 Intune - Software Updates Deployment Ring 2
A random selection of aproximately 10% of the Windows devices in the environment

(device.deviceManagementAppId -eq "0000000a-0000-0000-c000-000000000000") and (device.deviceTrustType -eq "ServerAD") and (device.deviceOwnership -contains "Company") and (device.deviceOSType -eq "Windows") and (device.objectId -match ".{32}(2|3|b).{3}")

Intune - All Corporately Owned Windows Devices
All Windows devices that are joined to either Entra-AD or On-Prem AD and are corporately owned

(device.deviceOSType -eq "Windows") and ((device.deviceTrustType -eq "ServerAd") or (device.deviceTrustType -eq "AzureAd")) and (device.deviceOwnership -eq "Company")

- 

Tuesday, April 16, 2024

Intune - Detection and Remediation scripts for BitLocker key escrow to Entra-AD (Azure AD / AAD)

The following detection and remediation scripts should fix 99% of all escrowing problems.  The biggest surprise item that I found in working with my client trying to remediate escrow problems was that if there was more than one Password Protector key the escrow would fail.  The remediation takes care of that issue (along with others).

Detection Script:

Friday, April 28, 2023

What should your secure MFA solution look like?

 I have run across many "MFA" implementations that are only providing a false sense of security because they aren't actually MFA at all.  After the most recent one, which had to do with income and financial documents I decided to write up a blog post so that I can share it with people to help them understand.  Even though I am writing this to help people fix bad MFA implementation, hopefully at least a few readers will find this useful to set up MFA properly in the first place.

First, what is MFA?  MFA stands for multi-factor authentication.  The consensus is that there are only three possible factors that you can work with, so you MFA means that you MUST use at least two of these factors to access whatever it is that you are attempting to access.  The three possible factors are:

  1. Something you know (like a password)
  2. Something you have (a physical item like a security key card, a company laptop, a specific cell phone, etc)
  3. Something you are (biometrics like fingerprints, voiceprint, retinal scan, etc)
We've all seen in movies where someone has to use both a key card and a hand scanner to enter an area... that's MFA.  A password followed by a voiceprint, also MFA.  A password then authentication using an app on your phone, that's MFA.

The problem, where most people mess it up, is the "MUST" in the definition.  Often "MFA" (when I put that in quotes it is the false sense of security and not truly MFA)... often "MFA" is set up to require a password and then has an option for the second factor to be an email, a text, or an authenticator app.  Seems fine on the surface but let's look closer at how people actually use email, texts, and cell phones (authenticator apps)...  Here's an example scenario:
  1. A bad actor lifts a cell phone off the table at a local coffee shop while its owner is up getting their latte.  The owner didn't bother to lock the phone (which is why it was an ideal target for this bad actor) so as long as the thief keeps touching the screen every couple minutes it will never lock.
  2. The thief scrolls through the email on the cell phone and finds a link to an financial website (that is supposedly protected by MFA).
  3. The thief goes to the portal and finds that the username is an email address, so they use the email address of the account on the phone and select the "forgot password" link.
  4. Ding!  The phone gets a reset password email from the portal website.  The thief resets the password and attempts to log in.
  5. The thief is now presented with the "MFA" prompt, would they like to authenticate with:
    • An Email message
    • A text message
    • An authenticator app
  6. The thief chooses "an email message" because they know that they have the email account, though likely a text message would come right to this phone and also likely the authenticator would as well.
  7. Ding! The thief gets the email for "MFA" and logs into the financial site.
  8. The thief proceeds to buy a bunch of cryptocurrency with the victims money and the disperse that into their laundering crypto-wallets.
This scenario works no matter how the victim's email account is compromised.  The scenario shows that there is only 1 factor, the user's email account.  Everything else is window dressing to give a false sense of security.  I see this repeated over, and over, and over.

In this scenario, simply having the user's logon name not be the email address AND blocking storage of that logon name in the browser might have prevented the theft.  I say "might" because the major underlying problem is using the primary email account as a recovery method.  If the attacker were able to click a "forgot username" link and get the username sent to that primary email address, they are still able to pull off the attack.

The fix is pretty simple... allow the option for a "recovery email address" that is separate from the email address used for normal correspondence.  Sure, many users will not avail themselves of the option, but that is on the user and not on you as the provider of the MFA system.

Also, not all authenticator apps are equal.  Only allow ones that require a second factor (preferably biometric, like fingerprint scan on the smartphone) before it will present the code/authentication item.
As of the time of this writing:
  • Apple Passwords has an option to require a fingerprint, PIN or password when you open the app or approve a notification and it is on by default on iDevices.
  • Google Authenticator has an option to require a fingerprint, PIN or password when you open the app or approve a notification and it is on by default on Android devices.
  • Microsoft Authenticator has an option to require a fingerprint, PIN or password when you open the app or approve a notification.
  • Okta Verify does not have an option to require a fingerprint, PIN or password before displaying the authentication code.  So, the scenario above would work just fine for the attacker if the authenticator app was SecurID.
  • SecurID does not have an option to require a fingerprint, PIN or password before displaying the authentication code.  So, the scenario above would work just fine for the attacker if the authenticator app was SecurID.
  • Symantec VIP Access does not have an option to require a fingerprint, PIN or password before displaying the authentication code.  So, the scenario above would work just fine for the attacker if the authenticator app was SecurID.
So, yeah, the scenario could have been thwarted if an authenticator were required, provided it was one of the big three providers, AND, big and here... the account recovery email address was different than the correspondence email address.  If the account recovery (not just password recovery. but account recovery) is on that primary email address then the attacker clicks the "recover my account", gets the email, and resets the MFA to either turn it off or uses their own phone to create a new one.  So again, the major underlying problem is using the primary email account as a recovery method.  In order to provide security to your clients you must give them the option to set a different email account as the recovery account.

So... what should your secure MFA solution look like?
  1. The user should be able to set up a second email account for any/all recovery options.  This is the most common mistake that I see made across "MFA" solutions.
  2. The user should choose an MFA solution (text/email/app/etc) at the time of their account setup and the other options should not be available during normal logon.  Either use the one that was set up or use a recovery option.  This is the second most common mistake that I see; what is the point of me setting up an authenticator app if you are still going to offer the would-be attacker the option of getting an SMS text or an email?
  3. A secure authenticator app (one that allows for that 2 factor on the phone) should be highly recommended during account setup.
  4. Email address should not be used as a username (not precisely an MFA item, but a basic security principle).
  5. Changing both the correspondence and recovery email addresses should be possible by the user.  Yes, I have actually seen quite a few sites that do not allow you to change your email address.  Usually the same ones that are using that email address as the logon.
  6. Require re-validation of the MFA (check their credentials again) to display/change the recovery address.
If you get those six things right then I'm pretty sure everything else will fall into place and you will have an actual MFA solution, not a "email is the only factor" solution.

Wednesday, December 7, 2022

Setting Peer Download options for SCCM boundary groups using Powershell

 If you have more than just a few boundary groups you have probably wanted a way to quickly set these options across all of them.  I suggest setting the options for your VPN boundary group(s) first. For VPN you probably want to prefer cloud based sources and not use peer downloads at all (to prevent peering with internal computers).  Once you have that set then you can run this little gem to set all of the others for what I believe is the best settings.  Of course you can modify it if you think other settings are best.

Here you go:

<#
.Synopsis
   Set SCCM Boundary Group Peer Cache options to Allow peer cache downloads within this Boundary Group but restrict downloads to peers within the same subnet.
.DESCRIPTION
   Use this in order to quickly change the peer cache options for a set of boundary groups.  The more boundary groups you have
   in your organization, the more beneficial this becomes.
   The flags (at time of writing) that you will see in the boundary groups are:
   0 - Allow peer downloads in this boundary group (only first check box is checked)
   1 - Do not allow peer downloads in this boundary group (no check boxes are checked)
   2 - Allow peer downloads in this boundary group but During peer downloads only use peers within the same subnet (first two check boxes are checked)
   9 - Prefer cloud based sources over on-premises sources and Do not allow peer downloads in this boundary group (only last check box is checked)
   I have not experimented to find out what results come from other combinations of check-boxes.
#>

#Change testmode to false to save the changes
$testmode=$false

#The Configuration Manager site code
$sitecode="ABC"

#The Configuration Manager Primary Server
$SMSProvider="SCCMserver.domain.com"

#the flag you want to set
$newflag=2
$BoundaryGroups = (get-wmiobject -Namespace root\sms\site_$sitecode -Class SMS_BoundaryGroup -computername $SMSProvider) | Where-Object {($_.Flags -NE 2) -and ($_.Flags -le 2)}
Foreach ($BoundaryGroup in $BoundaryGroups) {
    write-host "Setting $($BoundaryGroup.name) flags to $newflag (previously $($BoundaryGroup.flags))"
    $BoundaryGroup.Flags = $newflag
    Try {
        If (-not $testmode) {
            $result=$BoundaryGroup.Put()
            write-host "saved" -ForegroundColor green
        }
    } Catch {
        write-host "failed to set flag" -ForegroundColor red
    }
}

Thursday, December 1, 2022

Controlling SCCM bandwidth Utilization


There are four items that control network bandwidth utilization within SCCM: 

  1. BITS client setting – The download of data from the distribution point to the client is a BITS download.  In the client settings of the clients the rate of those downloads can be adjusted.  However, this is client side and does not know about bandwidth on the network so if enough clients, even if all configured to 1Mbps, are trying to download at the same time it can still clog the WAN.
    https://learn.microsoft.com/en-us/mem/configmgr/core/clients/deploy/about-client-settings#background-intelligent-transfer-service-bits

    I recommend setting the BITS settings but to something that will work for your organization.  Exactly what that is varies greatly from one organization to another.

    Client Settings items for BITS


  2. Rate Limit Schedules –  Set in the Distribution Point properties, this controls maximum data that can be sent to each distribution point  at any given time of day.  This is to prevent WAN saturation while getting the data onto the distribution points prior to deployment to clients.
    https://learn.microsoft.com/en-us/mem/configmgr/core/plan-design/hierarchy/manage-network-bandwidth#BKMK_PlanningForThrottling

    I recommend setting the rate limits but to something that will work for your organization.  Exactly what that is varies greatly from one organization to another.  Remember that this is set individually for each distribution point.

    Distribution Point properties setting for Rate Limits


  1. LEDBAT - Where BITS worked client side, LEDBAT works server side to control bandwidth usage.  Like the throttling rate limits it is enabled on each distribution point individually.  The idea is that it dynamically adjusts transfer rates so that clients only use network bandwidth when it's available.
    https://learn.microsoft.com/en-us/mem/configmgr/core/plan-design/hierarchy/fundamental-concepts-for-content-management#windows-ledbat

    I recommend turning this on for every distribution point.

    Distribution Point properties setting for LEDBAT

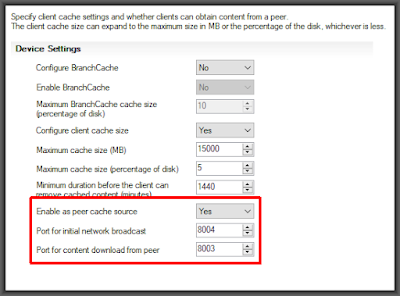
  1. Peer caching technologies – Peer caching takes at least a portion of the load off of the WAN by allowing clients to share cached deployment data with each other.  We would limit this to only peers that are on the same subnet in order to ensure that they are never going cross-WAN. There are three peer caching technologies available in SCCM.  Without going deep on all of them I will just say that the on I recommend using is “Peer cache” for on-premises and Delivery Optimization for cloud (Intune).  Yes, use both if you have both on-prem SCCM and Intune because Delivery Optimization gives no benefit to your Line-of-Business applications or anything else that is not delivered from Microsoft's global distribution network.
    https://learn.microsoft.com/en-us/mem/configmgr/core/plan-design/hierarchy/fundamental-concepts-for-content-management#peer-caching-technologies

    I suggest turning on Peer Cache for all non-VPN connected clients and enabling peer downloads, but limited to same subnet, on all non-VPN boundary groups.

    Client Settings items for Peer Cache

    Boundary Group Setting for Peer Cache


Export all Scheduled Tasks

Unfortunately I've not yet figured out how to export the schedule itself, but for everything else run an elevated Powershell and: 


$outcsv = "C:\Users\$env:USERNAME\desktop\taskdef.csv"
Get-ScheduledTask |
ForEach-Object { [pscustomobject]@{
Name = $_.TaskName
Path = $_.TaskPath
User = $_.Principal.UserID
LastResult = $(($_ | Get-ScheduledTaskInfo).LastTaskResult)
NextRun = $(($_ | Get-ScheduledTaskInfo).NextRunTime)
Status = $_.State
Command = $_.Actions.execute
Arguments = $_.Actions.Arguments }} |
Export-Csv -Path $outcsv -NoTypeInformation

Friday, March 25, 2022

Get Number of Days since last Windows Udpate was applied

In order to pre-emptively identify computers that are not getting software updates you might want to know how long it has been since they last applied a Windows Update.  Here you go:

$TimeNow = Get-Date
$LastSUInstall = ((Get-WmiObject -Class win32_quickfixengineering -Namespace root\cimv2).InstalledOn | sort -Descending)[0]
[Int]$OutputInt = ($TimeNow.Subtract($LastSUInstall)).Days
Write-Output $OutputInt

Wednesday, February 2, 2022

Why using Windows Hello is less secure than not using it

Let's try a thought experiment...

You are guarding the gate of a castle.  That gate is the only way into the castle.  In order to enter via the gate a password is required.  When someone comes up to the gate, you challenge them, "PASSWORD!" and they respond either with the correct password or not.  Based on their response you either allow them entry or you don't.  The password to every royal estate is the same, so any noble-person that knows the password can enter every royal estate.

Some bandits got ahold of the password and began raiding the royal estates.  In response the king changed the password and then in order to increase security even further he had his masons put a hole in the castle wall and install another gate.  He placed another guard at the new gate and this guard was told to require a slip of paper, signed by the king, be presented to allow entry... a "certificate of entry".  The certificate only works at the one castle/computer, unlike the password which the king uses at every one of his estates.  

The king did not get rid of your gate, people can still enter using the (now changed) password but they can also enter through the other gate by presenting their certificate of entry.

Now... was the castle more secure when it only had one entry point or is it more secure now that it has two?  Obviously one entry point is more secure than two, but the king is hoping that using the certificates of entry will keep the bandits from plundering his other holdings as well.  If the bandits got ahold of a certificate of entry they can enter the castle and plunder it, but they cannot enter other royal estates.  That's good, it is keeping the other estates secure.  

So, soon the bandits did just that.  They intercepted a nobleman, stole his certificate of entry into the castle.  Once inside the castle, being smarter than the king had given them credit for, the bandits hid out near your gate and listened for the password.  They then ran amock plundering all of the estates again AND stealing more certificates of entry to those other locations as well.

Just like the second gate at our imaginary castle, Windows Hello opens up a second gate to any computer upon which it is used.  So, each and every one of those computers is less secure.  Just like the certificate of entry to our castle once Windows Hello is breached it can be reused to access that computer.

Now, unlike our imaginary castle, Windows Hello actually presents two gates itself; the PIN, or click-on-pic, or biometric that is used for the user interface and the certificate that is actually passed from the computer to the network.  This allows for two distinct avenues of attack.  If an attacker gets that certificate then they can replay it infinitely (because you cannot change it as the user) to access the network from that computer (not from just any computer, but who cares at that point).  The attacker could obviously get ahold of the PIN or Click-On-Pic combination just like normal shoulder surfing for passwords.  But the scariest of all is if the attacker subverts the biometrics.  Good luck changing your fingerprints or IR signature should an attacker be able to duplicate them.

Your password can always be used as a back up to Windows Hello.  So, Windows Hello is really just opening another hole in the wall.  If the attacker does get inside through Windows Hello, it is much easier to get the password from the inside than it is from outside.  Your password is stored (encrypted) on the device even if you are using Windows Hello and there is also a high probability that you will need to provide your password at some other gate and it can be intercepted when you do so.

That, my friends, is why using Windows Hello is less secure than not using Windows Hello.

Wednesday, November 17, 2021

DISM Servicing Script


This was born of my need to remove OneDrive from annoying everyone into installing it.  My client will soon be turning on OneDrive for Business, so the default OneDrive needed to be removed from the image.  I also found that I couldn't install one of their pieces of financial software because .NET 3.5 was not enabled and, though I could just enable it with a one-liner in the task sequence, I thought it would be nice if their image just had that turned on.  I also thought that it would be nice to have CMTrace.exe available on every PC in my environment.

Finally (and the part the prompted me into actually scripting the whole thing) I found it annoyingly difficult to change the default user's theme, including the lock screen, without a GPO.  The issue is that Trusted Installer service protects the area where the themes are stored, so if the machine is online you have to take ownership of the files which subverts the Trusted Installer.  I wanted to have my theme work but also have Trusted Installer work.  You can do this with SysPrep but I decided to do some offline manipulation of the image because I wanted to practice my "DISM-FU".

So, here it is.  The script mounts the WIM, enables .NET 3.5, copies in the wallpaper and .theme files for the theme, sets a registry item in HKU\.default's RunOnce to run the theme thus setting it active on a user's first logon, sets the lock screen registry items, and finally rips out OneDriveSetup.exe itself and the call to run it from HKU\.default.

SourceWIM = the location of your WIM file that you want to edit
FeaturesSource = the "sources" folder from your original Windows 10 media
WallpaperSource = the network location where you have stored the wallpaper you want to use
LockScreenSource = the file name within WallpaperSource to use as the lock screen
CMTraceSource = network location of CMTrace to copy into the WIM
LogFile = Where you would like this script to spit out its log file

I often comment out the unmount line at the end so that I can make adjustments if I want to after the .bat file runs.

Here it is, enjoy

MD C:\DISMTemp

DISM /Mount-wim /WimFile:"\\server.domain.com\OperatingSystemDeployment\OS Images\Win10v20H2\Win10v20H2\Win10v20H2.WIM" /index:1 /MountDir:C:\DISMTemp

DISM /Image:C:\DISMTemp /Enable-Feature /FeatureName:NetFx3 /All /LimitAccess /Source:"\\server.domain.com\OperatingSystemDeployment\OS Images\Win10v20H2\sources"


COPY "\\server\ApplicationManagement\_Scripts\ManageTheme\Company*.themepack" "C:\DISMTemp\Windows\SysWOW64\Resources\Themes\*.*"

COPY "\\server\ApplicationManagement\_Scripts\ManageTheme\LockScreen_Company.jpg" "C:\DISMTemp\Windows\SysWOW64\Resources\Themes\*.*"

COPY "\\server\ClientTools\ConfigMgr 2012 Toolkit R2\ClientTools\CMTrace.exe" "C:\DISMTemp\Windows\System32"


REG.EXE load HKLM\DISMHKLMSoftware C:\DISMTemp\Windows\System32\config\software

REG.EXE load HKLM\DISMHKUD C:\DISMTemp\Windows\System32\config\DEFAULT


REG.EXE add "HKLM\DISMHKLMSoftware\Microsoft\Windows\CurrentVersion\Themes" /v "InstallTheme" /t REG_SZ /d "%systemroot%\Resources\Themes\Company.themepack" /f

REG.EXE add "HKLM\DISMHKLMSoftware\Policies\Microsoft\Windows\Personalization" /v “LockScreenImage” /t REG_SZ /d ”%systemroot%\Resources\Themes\Lockscreen_Company.jpg” /f

REG.EXE add "HKLM\DISMHKLMSoftware\WOW6432Node\Microsoft\Windows\CurrentVersion\Themes" /v "InstallTheme" /t REG_SZ /d "%systemroot%\Resources\Themes\Company.themepack" /f

REG.EXE add "HKLM\DISMHKLMSoftware\WOW6432Node\Microsoft\Windows\Personalization" /v “LockScreenImage” /t REG_SZ /d ”%systemroot%\Resources\Themes\Lockscreen_Company.jpg” /f


REG.EXE add "HKLM\DISMHKUD\Software\Microsoft\Windows\CurrentVersion\Themes" /v "InstallTheme" /t REG_EXPAND_SZ /d "%systemroot%\Resources\Themes\Company.themepack" /f


REG.EXE unload HKLM\DISMHKLMSoftware

REG.EXE unload HKLM\DISMHKUD


REM DISM /UnMount-WIM /MountDir:C:\DISMTemp /discard

REM DISM /UnMount-WIM /MountDir:C:\DISMTemp /commit 

Extract Specific Edition Wim from Multiple Edition Wim

 Extract Specific Edition Wim from Multiple Edition Wim

  1. Mount the ISO, locate the drive and navigate to find the location of install.wim (drive:\sources\install.wim)

  2. Open PowerShell with elevated rights. Run the following command:

    Get-WindowsImage -ImagePath <drive:>\sources\install.wim

  3. We can see existing install.wim consists of following 10 Windows 10 versions:
    Windows 10 Education
    Windows 10 Education N
    Windows 10 Enterprise
    Windows 10 Enterprise N
    Windows 10 Pro
    Windows 10 Pro N
    Windows 10 Pro Education
    Windows 10 Pro Education N
    Windows 10 Pro for Workstations
    Windows 10 Pro N for Workstations

  4. Run following command to extract enterprise wim from multiple edition wim :

    Export-WindowsImage -SourceImagePath <drive:\sources\install.wim> -DestinationImagePath <drive:\folder\FileName.wim> -SourceIndex <#>


    Where -SourceImagePath is the location of original install.wim, -DestinationImagePath is where you want to save the new wim, -SourceIndex is the index number of Windows 10 version, in this case it is Enterprise edition.

    Example: Export-WindowsImage -SourceImagePath F:\sources\install.wim -DestinationImagePath C:\Win10_20H2\20H2Ent.wim -SourceIndex 3

Friday, June 18, 2021

SCOM Gateway Certificates

It took me forever to put together this definitive step-by-step on how to create the SCOM Gateway Certificates template.  There is a lot out there about the fact that you need them, how to install them, etc.  But when you need to give someone instructions on how to create the template that information is hard to come by.  These instructions are for a Microsoft CA, obviously if you are using a different Certificate Authority then it will vary but this should still have the essentials that you need.  Enjoy...

On the CA,

1. Select "Manage" under Certificate Templates

2. Select the template "Ipsec Offline request" and select duplicate template

○ Compatibility tab 

§ Leave defaults

○ General Tab

§ Set an appropriate Name (like SCOM Gateway Certrificate Template)

§ Set Validity to 2 years

§ Set Renewal period to 6 weeks

○ Request Handling tab 

§ check Allow Private Key to be exported (this is essential and very important as you will be exporting these to import on the management servers)

○ Cryptography tab

§ select "Providers Microsoft RSA SChannel Cryptographic Provider"

§ Select "Microsoft Enhanced Cryptographic Provider v 1.0"

○ Extensions tab

§ select Application Policies click edit 

§ select Client Authentication and Server Authentication

○ Security tab

§ Under Groups or user names click "Add"

§ Select the object type of "Computer"

§ Search for the management server names

§ Grant Read and Enroll permissions to the Management Servers.  This allows the management servers to auto-renew, you will still have to manually renew the gateways.  Depending upon your AD trust relationships you may be able to add the gateways as well and then they would also be able to auto-renew.  However if that sort of trust exists then you likely did not need the gateway in the first place.  But, point is, there is no harm trying to add the gateways and it may end up helping you.


Go back to the Certificate Authority Console

3. Right-click Certificate Template, select New Certificate Template to Issue

• Select the new template created in step 2


On the management server

1. Launch https://ad/certsrv (https://adservername/Certsrv) from Management Server and select Advanced certificate request

2. Select the certificate template created in step 2.

Certreq inf settings:

[NewRequest]

Subject="CN=<YOUR SERVER FQDN>"

Exportable=TRUE

KeyLength=2048

KeySpec=1

KeyUsage=0xf0

MachineKeySet=TRUE

[EnhancedKeyUsageExtension]

OID=1.3.6.1.5.5.7.3.1

OID=1.3.6.1.5.5.7.3.2


Monday, January 25, 2021

Change Windows Updates Server on Network Location Change

I had a client that had implemented a new VPN solution that uses Network Access Control to have the client check Windows Updates and report to the VPN server how many updates it is missing.  If the client is missing too many updates then the client was not allowed on VPN.

This sounds great until WSUS is involved.  With WSUS the computer points to a server inside of the network boundary to get its updates, so when the VPN said "go check the client could not get to its update server and therefore could not get on VPN.

The client did have a cloud management gateway so if the clients were pointed to the CMG they could connect, however when on VPN they cannot communicate with the CMG and therefore cannot get updates.  This leads to a catch-22... either they cannot VPN or they cannot get updates.  Both are critical.  So, here's what I came up with.

  1. Use a Scheduled Task that triggers on any network connection being established or disconnected (both connect and disconnect must be checked).  
    • When the trigger occurs, check the existing network connections to determine if we are inside of the network boundary or if we are completely out on the internet and change the Windows Updates server accordingly.
  2. Use a PowerShell script to do the checks and make the changes mentioned in #1 (the action for the Scheduled Task).
  3. Use an SCCM Configuration Item to ensure that all of the computers have the PowerShell script and the Scheduled Task.
    • The configuration item should be scripted to install the Scheduled Task and Powershell script if they do not exist.

So here we go:

The scheduled task is built from this .xml:

<?xml version="1.0" encoding="UTF-16"?>
<Task version="1.4" xmlns="http://schemas.microsoft.com/windows/2004/02/mit/task">
  <RegistrationInfo>
    <Description>Checks settings whenever a network connection is started to ensures that the Windows Update server is correctly updated for internal (on premises or VPN) network or external (internet) network.</Description>
    <URI>\Change Windows Updates Server on Network Change</URI>
  </RegistrationInfo>
  <Triggers>
    <EventTrigger>
      <ExecutionTimeLimit>PT30M</ExecutionTimeLimit>
      <Enabled>true</Enabled>
      <Subscription>&lt;QueryList&gt;&lt;Query Id="0" Path="Microsoft-Windows-NetworkProfile/Operational"&gt;&lt;Select Path="Microsoft-Windows-NetworkProfile/Operational"&gt;*[System[Provider[@Name='Microsoft-Windows-NetworkProfile'] and EventID=10001]]&lt;/Select&gt;&lt;/Query&gt;&lt;/QueryList&gt;</Subscription>
    </EventTrigger>
    <EventTrigger>
      <ExecutionTimeLimit>PT30M</ExecutionTimeLimit>
      <Enabled>true</Enabled>
      <Subscription><QueryList><Query Id="0" Path="Microsoft-Windows-NetworkProfile/Operational"><Select Path="Microsoft-Windows-NetworkProfile/Operational">*[System[Provider[@Name='Microsoft-Windows-NetworkProfile'] and EventID=10001]]</Select></Query></QueryList></Subscription>
    </EventTrigger>
  </Triggers>
  <Principals>
    <Principal id="Author">
      <UserId>S-1-5-18</UserId>
      <RunLevel>HighestAvailable</RunLevel>
    </Principal>
  </Principals>
  <Settings>
    <MultipleInstancesPolicy>Queue</MultipleInstancesPolicy>
    <DisallowStartIfOnBatteries>false</DisallowStartIfOnBatteries>
    <StopIfGoingOnBatteries>false</StopIfGoingOnBatteries>
    <AllowHardTerminate>true</AllowHardTerminate>
    <StartWhenAvailable>false</StartWhenAvailable>
    <RunOnlyIfNetworkAvailable>false</RunOnlyIfNetworkAvailable>
    <IdleSettings>
      <StopOnIdleEnd>false</StopOnIdleEnd>
      <RestartOnIdle>false</RestartOnIdle>
    </IdleSettings>
    <AllowStartOnDemand>true</AllowStartOnDemand>
    <Enabled>true</Enabled>
    <Hidden>false</Hidden>
    <RunOnlyIfIdle>false</RunOnlyIfIdle>
    <DisallowStartOnRemoteAppSession>false</DisallowStartOnRemoteAppSession>
    <UseUnifiedSchedulingEngine>true</UseUnifiedSchedulingEngine>
    <WakeToRun>false</WakeToRun>
    <ExecutionTimeLimit>PT1H</ExecutionTimeLimit>
    <Priority>7</Priority>
  </Settings>
  <Actions Context="Author">
    <Exec>
      <Command>powershell.exe</Command>
      <Arguments>-executionpolicy bypass -file "C:\Windows\CCMCache\Check-WUServerSetting.ps1"</Arguments>
    </Exec>
  </Actions>
</Task>


 The action for the scheduled task is to run this PowerShell script (Check-WUServerSettings.ps1) :

#
.Synopsis
   Check-WUServerSettings.ps1 checks the registry items for the Windows Update Server
.DESCRIPTION
   Checks the registry items for the Windows Update Server to be sure they are set correctly
   for internal/external networks.  This was created to ensure that the settings switched when
   changing between VPN and off VPN but may have other uses.  This was necessitated by an F5
   VPN with Network Access Controls that checked software updates, if the computer could not
   connect to the software updates server at the time of that check then the user could not
   connect to VPN.
.INPUTS
   There are no command line inputs.  However $InternalServer and $ExternalServer need to be
   modified to represent the correct values for your organization
.OUTPUTS
   If the script detects that the registry values are correct it will return the registry value
   otherwise it returns nothing (so that it can be used as a detection script in SCCM).
.NOTES
   Written 01/19/2021 by Mark Randol - randoltech.blogspot.com
#>


$InternalServer = "http://WSUSServer.YourCompany.com:8530"
$ExternalServer = "https://CMGServer.YourCompany.COM/CCM_Proxy_ServerAuth/12345678901234567"
$IsCompliant = $false

if (get-item "HKLM:\SOFTWARE\Policies\Microsoft\Windows\WindowsUpdate") {
    $WUServerValue = (Get-ItemProperty "HKLM:\SOFTWARE\Policies\Microsoft\Windows\WindowsUpdate").WUServer
    $WUStatusServerValue = (Get-ItemProperty "HKLM:\SOFTWARE\Policies\Microsoft\Windows\WindowsUpdate").WUStatusServer
}

if (Get-NetIPConfiguration | Where-Object { $_.NetAdapter.Status -ne "Disconnected" -and ($_.NetProfile.Name -eq "YourCompany.com") }) { #check settings for internal servers
    $InsideBoundary = $true
    if ($WUServerValue -ne $InternalServer -or $WUStatusServerValue -ne $InternalServer ) { #change the server values if any are wrong for internal
        Set-ItemProperty "HKLM:\SOFTWARE\Policies\Microsoft\Windows\WindowsUpdate" -Name WUServer -Value $InternalServer
        Set-ItemProperty "HKLM:\SOFTWARE\Policies\Microsoft\Windows\WindowsUpdate" -Name WUStatusServer -Value $InternalServer
    }   
    #Check the values again to be sure that they got set  
    $WUServerValue = (Get-ItemProperty "HKLM:\SOFTWARE\Policies\Microsoft\Windows\WindowsUpdate").WUServer
    $WUStatusServerValue = (Get-ItemProperty "HKLM:\SOFTWARE\Policies\Microsoft\Windows\WindowsUpdate").WUStatusServer
    if ($WUServerValue -eq $InternalServer -and $WUStatusServerValue -ne $InternalServer ) {$IsCompliant = $true }
} # check settings for internal servers
else { #check settings for external servers
    $InsideBoundary = $false
    if ($WUServerValue -ne $ExternalServer -or $WUStatusServerValue -ne $ExternalServer  ) { #change the server values if any are wrong for external
        Set-ItemProperty "HKLM:\SOFTWARE\Policies\Microsoft\Windows\WindowsUpdate" -Name WUServer -Value $ExternalServer
        Set-ItemProperty "HKLM:\SOFTWARE\Policies\Microsoft\Windows\WindowsUpdate" -Name WUStatusServer -Value $ExternalServer
    }
    #Check the values again to be sure that they got set  
    $WUServerValue = (Get-ItemProperty "HKLM:\SOFTWARE\Policies\Microsoft\Windows\WindowsUpdate").WUServer
    $WUStatusServerValue = (Get-ItemProperty "HKLM:\SOFTWARE\Policies\Microsoft\Windows\WindowsUpdate").WUStatusServer
    if ($WUServerValue -eq $ExternalServer -and $WUStatusServerValue -ne $ExternalServer ) {$IsCompliant = $true }
} # check settings for external servers

if ($IsCompliant = $true) {
    $OutputString = "Windows Update Server = $WUServerValue"
#    Write-Output $OutputString
    Exit $OutputString
}
else {
}


To install the PowerShell script I used this batch file (InstallCheck-WUServerSetting.bat):

copy Check-WUServerSetting.ps1 C:\Windows\CCMCache\Check-WUServerSetting.ps1 /Y
powershell.exe -executionpolicy bypass -file .\InstallCheck-WUServerSetting.ps1


And the PowerShell script called by the batch file (InstallCheck-WUServerSetting.ps) contains just this one line (yes, I could have simplified and put the 1 liner into the .bat but that would entail messing around with the quotation marks for an hour or so to get them right):

Register-ScheduledTask -Xml (get-content 'Change Windows Updates Server on Network Change.xml' | out-string) -TaskName "Change Windows Updates Server on Network Change"


Once we have all of that, we create an application in SCCM containing the four files.  We create a deployment method of the .bat file and a detection method of checking for existence of "C:\Windows\CCMCache\Check-WUServerSetting.ps1".

End result is that every time you connect/disconnect a network the script "C:\Windows\CCMCache\Check-WUServerSetting.ps1" gets called by the Scheduled Task and sets the registry settings for your Windows Updates servers correctly.

I put the scheduled task's action script into CCMCache because that is a protected folder to which the user should not generally have access.

Thursday, January 14, 2021

Powershell - Check if computer is On-Premise, on VPN, or outside on the Public Internet

Powershell - Check if computer is on premises (or VPN) or outside on the Internet

If, when you run the following command, your domain name appears in the list then your computer is inside of your network boundary (could be physically inside or on VPN).

(Get-NetIPConfiguration | Where-Object { $_.NetAdapter.Status -ne "Disconnected" }).NetProfile.Name

So, expanding on that command, here's a script that you can use in something like an SCCM configuration item to check it:
<#
.Synopsis
   Check-NetBoundary checks if the computer is inside the network, on VPN, or outside on the internet
.DESCRIPTION
   Returns "Public", "On-Premises", or "VPN" depending on results.
   Check-NetBoundary checks if the computer is inside the network or outside on the internet
   This was originally written to determine if computers were connected on VPN or not but may have other uses.
   Change the variable $CompanyNetProfileName to equal your own domain name (or the name given to your network connection profile if it is different than your domain).
   Written 01/14/2021 by Mark Randol - randoltech.blogspot.com
#>


CLS
$CompanyNetProfileName = "mydomain.com"
$Location = "Public"
$InsideBoundary = $false
if (Get-NetIPConfiguration | Where-Object { $_.NetAdapter.Status -ne "Disconnected" -and $_.NetProfile.Name -eq $CompanyNetProfileName}) {
    $Location = "On-premises"
    if (Get-NetIPConfiguration | Where-Object { $_.NetAdapter.Status -ne "Disconnected" -and $_.NetProfile.Name -ne $CompanyNetProfileName}) {
        $Location = "VPN"
    }
}
Write-Output $Location

Friday, December 11, 2020

SCCM - Manage an Untrusted Forest

In order to configure an SCCM management point to manage an untrusted domain:

  1. Ensure that the firewall ports are open between the two domains:
    TCP 53 (DNS) from SCCM Management Point -> to untrusted forest
    TCP 389 (LDAP) from SCCM Management Point -> to untrusted forest
    TCP 80 (HTTP) from untrusted forest -> to SCCM Management Point
    TCP 443 (HTTPS) from untrusted forest -> to SCCM Management Point
    TCP 445 (SMB to DP) from untrusted forest -> to SCCM Management Point
    TCP 8530 (SUP http) from untrusted forest -> to SCCM Management Point
    TCP 8531 (SUP https) from untrusted forest -> to SCCM Management Point
    TCP 10123  from untrusted forest -> to SCCM Management Point

  2. Configure DNS with conditional forwarder or STUB ZONES in in both forests for SCCM to resolve remote hostnames in the untrusted domain and for the remote clients to perform system discovery
  3. Create an Active Directory Forest Account in the untrusted forest that will be used to publish the SCCM site information into System Management container.

  4. It is highly recommended that you extend the schema in untrusted forest as this will make things much easier by adding the following items to AD: Attributes:
  5. cn=mS-SMS-Assignment-Site-Code
    cn=mS-SMS-Capabilities
    cn=MS-SMS-Default-MP
    cn=mS-SMS-Device-Management-Point
    cn=mS-SMS-Health-State
    cn=MS-SMS-MP-Address
    cn=MS-SMS-MP-Name
    cn=MS-SMS-Ranged-IP-High
    cn=MS-SMS-Ranged-IP-Low
    cn=MS-SMS-Roaming-Boundaries
    cn=MS-SMS-Site-Boundaries
    cn=MS-SMS-Site-Code
    cn=mS-SMS-Source-Forest
    cn=mS-SMS-Version
     
    Classes:
    cn=MS-SMS-Management-Point
    cn=MS-SMS-Roaming-Boundary-Range
    cn=MS-SMS-Server-Locator-Point
    cn=MS-SMS-Site

  6. Create the System Management container in the untrusted forest. Provide full control permission on this container to the Active Directory Forest Account that you created earlier.
  7. In the SCCM console add the untrusted forest.  In the Administration workspace, expand Hierarchy Configuration, and click Active Directory Forests, then on the Home tab, in the Create group, click Add Forest to open the Add Forests dialog box.  Use the Active Directory Forest Account that you created earlier.  Monitor hman.log for any errors.

  8. Check in the untrusted forest to ensure that site information is published into System Management container.

  9. If you want to discover clients from untrusted forest automatically then you must configure AD system discovery.  If you have not configured the DNS conditional forwarder system discovery will not work due to name resolution (monitor log Adsysdisc.log for any errors).

  10. If you want to perform client push installation, create an SCCM Client Installation Account in untrusted forest and configure it in SCCM server.

  11. Configure boundaries in SCCM for untrusted forest to manage clients.

  12. If clients in untrusted forest are unable to resolve SCCM roles like MP,DP ,SUP etc for client installation and assignment process or for downloading the policies then you need to add the required entries (MP,DP,SUP) into the DNS of the untrusted forest or in the local host file on each client.  This should only be required if the schema was not extended.

Again, you must make sure the ports 80, 443, 8530 and 8531 are working from the untrusted forest to SCCM servers otherwise you cannot get basic things like software distribution, software updates etc.

Thursday, December 10, 2020

Software Updates Classifications and Products


Classifications:


·       Critical Updates: Specifies a widely released fix for a specific problem that addresses a critical, non-security-related bug.


·       Definition Updates: Specifies a widely released and frequent software update that contains additions to a product's definition database.


·       Feature Packs: Specifies new product functionality that is first distributed outside of a product release and that's typically included in the next full product release.


·       Security Updates: Specifies a widely released fix for a product-specific, security-related vulnerability.


·       Service Packs: Specifies a tested, cumulative set of all hotfixes, security updates, critical updates, and updates that are applied to a product. Additionally, service packs may contain additional fixes for problems that are found internally since the release of the product.


·       Tools: Specifies a utility or feature that helps to complete one or more tasks.


·       Update Rollups: Specifies a tested, cumulative set of hotfixes, security updates, critical updates, and updates that are packaged together for easy deployment. An update rollup generally addresses a specific area, such as a security or product component.


·       Updates: Specifies a widely released fix for a specific problem. An update addresses a non-critical, non-security-related bug.


·       Upgrade: Specifies an upgrade for Windows 10 features and functionality. These updates are also known as feature updates for Windows 10 operating systems. Your software update points and sites must run a minimum of WSUS 6.2 with the hotfix 3095113 to get the Upgrade classification. For more information about installing this update and other updates for Upgrades, see Prerequisites for software updates.


Microsoft Surface drivers are not in any of the classifications, you must check the check-box at the bottom of the classifications tab because Microsoft can never stick to any one naming convention or standard.


Green = Definitely want to include these

Orange = Discuss within your organization whether to include these

Red = Generally don't want to do this


Products


For most products, just select what you actually have in your environment.  Use software inventories to determine whether or not the product exists.  If you are unsure what the product is, search for it on the Internet as it may actually be something that you have but are unaware of (such as CAPICOM).


For the long list of Windows 10 products select:

·         Windows 10 (covers all windows versions prior to 1903)

·         Windows 10 version 1903 and later

·         Windows 10 LTSB (only if you have LTSB in your environment)


Do not select:

·         Products that contain the word "Drivers". Drivers are not deployable from ConfigMgr (via Software Updates) so these WSUS product categories should not be chosen in ConfigMgr as nothing will show up for them anyway in ConfigMgr.

·         Products that contain "Dynamic Updates" or "GDR-DU" as these are for Windows Setup and thus only applicable during Windows installation and thus not deployable from ConfigMgr and will also not result in any updates showing in the ConfigMgr console.

·         Products that contain "Upgrade & Servicing Drivers" as These refer to drivers exclusively required during a dynamic update.


Microsoft Surface drivers are distributed as "Updates", not as "Drivers" because Microsoft can never stick to any one naming convention or standard. 


Language Packs and Windows 10 Features On Demand


Windows 10 Features On Demand refers to features you can add via the Control Panel under Programs or the App Settings under Apps & Features. Beginning with Windows 10 1709, you can’t use WSUS to host Features on Demand and language packs for Windows 10 clients. Instead, you need to download them directly from Windows Update. If you’re using SCCM or WSUS for your software update, you need to change a Group Policy setting that lets clients download these directly from Windows Update instead of your on-premise infrastructure. Without this group policy, all your installation tentative will fails with error 0x800f0954. This is because your client will check on your on-premise servers instead of Microsoft Update and won’t be able to find the feature.


Reference <https://docs.microsoft.com/en-us/mem/configmgr/sum/get-started/configure-classifications-and-products>
Reference <https://systemcenterdudes.com/deploy-sccm-feature-on-demand/>

Reference <https://4sysops.com/archives/selecting-products-in-wsus-for-windows-10/>

Wednesday, December 9, 2020

Software Updates Deployments Concepts and Considerations

 There are a lot of things to consider when using SCCM to deliver software updates.  This document covers:

  • Active directory computer groups
  • Maintenance Windows
  • Software Updates Deployment Collections
  • Selection of Software Updates Classifications and Products
  • Automatic Deployment Rules
  • Software Update Groups and Software Updates Packages
  • Client Settings
  • Periodic Maintenance of your SCCM updates environment


Active Directory Consideration


If you do not want the requirement of SCCM console access for people to change maintenance windows then you will want to set up Active Directory Computer Groups for your maintenance windows.  This will allow your service desk or server administrators or a CMDB product like ServiceNow or Tivoli to move computers in and out of maintenance windows without the need for the console or bothering an SCCM administrator to move them.


It is recommended that you create a selection of maintenance window computer groups from which your organization may choose.  Be sure that some are during the day (because there are servers that do most of their work at night) and that there is a nice, broad selection of windows throughout the week/weekend.


It is recommended that you name these maintenance windows very similar to the names used in SCCM.  Use 24hour time annotation rather than AM/PM.  For all naming conventions it is recommended that the broadest term be on the left moving toward the narrowest term on the right.

Here is an example of a good naming convention:

CG-MWSU-06FRI-2000-0000

This breaks down to:

CG = Computer Group - this is for organizing your own Active Directory.  You may already have a convention for designating object types within your AD.  This item type is the broadest term in our name.

MW = Maintenance Window - this is less broad than CG because it defines what the CG is used for.

SU = Software Updates - there are different types of maintenance windows used in SCCM; software updates, task sequence, standard deployments.  So this defines what the MW is used for.

06 = this is strictly for sorting the days of the week so that things lay out nicely for human viewing in the console.  01=Sun, 02=Mon and so on.

FRI = human readable day of week corresponding to the aforementioned number.  This helps to reduce human error by removing the necessity to calculate the day of the week every time someone goes to make a change.

2000-0000 = The actual window, in this case 8pm to midnight.  4hrs is the recommended window length.


By creating AD Computer Groups for your maintenance windows you will enable the ability to delegate the management of the maintenance windows to persons or automation that knows nothing about SCCM.  That capability may become very valuable to you in the future even if it is not something that you currently need.


Maintenance Windows


Within SCCM you should create a folder named "Maintenance Windows".  Create *ALL* maintenance windows within this folder.  *NEVER* assign a maintenance window to any collection outside of this folder.  The reason for being so emphatic about locating all of your MWs within this folder is that maintenance windows are additive.  This means that if you place a computer into a collection that has a MW of 8pm to midnight on Fri and you also place that computer into a collection with a MW of midnight to 4am on Sat then the computer effectively has a MW of 8pm Fri to 4am Sat.  That's all well and good but now imagine trying to figure out what the effective MW of a computer is if you have assigned MWs to collections throughout your SCCM environment.  It is imperative, for your own sanity, that you keep all of your MWs in one place.


Within your "Maintenance Windows" folder create a folder called "Software Updates MWs" and put all of your software updates maintenance windows within that.  Do the same for Task Sequences and General maintenance windows.  Do not mix types, again, for your own sanity.


It is recommended that you name these maintenance windows very similar to the names used in AD.  Use 24hour time annotation rather than AM/PM.  For all naming conventions it is recommended that the broadest term be on the left moving toward the narrowest term on the right.

Here is an example of a good naming convention:

MWSU-06FRI-2000-0000

This breaks down to:

MW = Maintenance Window

SU = Software Updates

06 = numerical day of week for sorting in the console.

FRI = human readable day of week

2000-0000 = The actual window in 24hr time.  4hrs is the recommended window for software updates.


Populate your maintenance window collections by creating the collection's query for the attribute class "System Resource" and the attribute "System Group Name" is equal to your AD computer group name.  Note that Active Directory Group Discovery needs to be enabled within SCCM in order for this to work.  Also remember to exclude your manual update collection as you create your MW collections.


Manual Update collection - almost every organization has a few computers, usually servers, that they wish to ensure only get deployed manually.  Create a collection for manual installations.  A suggested name would be something like "MWSU-Manual".  As you create your software updates maintenance windows set them to explicitly "exclude" members of this manual update collection so that these computers never end up in a maintenance window that automatically installs updates.


Do not put workstations into software updates maintenance windows.  You control when updates begin to deploy to workstations but you will want to allow them to install at any time so that workstations that are off overnight and whatnot will still get the updates at their next opportunity after your specified start time.


Software Updates Deployment Collections


Once you have your maintenance windows created it is time to create the collections to which you will actually (mechanically) assign the software updates deployments.  These collections will include all of your maintenance windows collections and your manual collection.


In the root of your Device Collections container in SCCM create a folder named Software Updates Deployments.  This will house your normal deployment collections but you will also want to place into this folder any "one-off" software updates deployment collections such as zero-day deployments or manually created deployments.


Create at least the four collections in green, if your organization wants a more staged approach then also create the two in orange.  These are named with a suggested naming convention where any collection that is going to be targeted with a deployment starts with DEP:


o    DEP - SU - Workstation Test - Populate this collection with workstations that will receive software updates first, before you send them to the rest of your organization.  You will deploy to this collection the first week that software updates get released from the manufacturer (Microsoft).  Include your manual collection here so that the administrators of those computers can install on whatever schedule they wish, early or late.  Be sure to exclude the manual installation collection just in case there are workstations that are "sensitive".

o    DEP - SU - Workstation Pilot - Populate this collection with your pilot workstations.  Workstations should not use maintenance windows (at least not for software updates) so no need to add maintenance windows collections.  Be sure to exclude the manual installation collection just in case there are workstations that are "sensitive".

o    DEP - SU - Workstation Standard - Because all of your other workstations have already been targeted by the time you are deploying "standard" you can just include "All Workstations" in this collection.   Be sure to exclude the manual installation collection just in case there are workstations that are "sensitive".

o    DEP - SU - Server Test - Populate this collection with servers that will receive software updates first, before you send them to the rest of your organization.  You will deploy to this collection the first week that software updates get released from the manufacturer (Microsoft).  Include your manual collection here so that the administrators of those computers can install on whatever schedule they wish, early or late.

o    DEP - SU - Server Pilot - Populate this collection with your pilot servers.  You will deploy to this collection the week after software updates get released from the manufacturer (Microsoft).

o    DEP - SU - Server Standard -  Because all of your other workstations have already been targeted by the time you are deploying "standard" you can just include "All Servers" in this collection.   Be sure to exclude the manual installation collection.


Software Updates Classifications and Products


You are almost ready to create some rules to deploy the software updates but before you can do that you need to decide exactly what will go into the deployments.  Use software inventory to help you decide on the products that you need for your organization.  Including products that do not exist in your organization or items that SCCM will not distribute as software updates will simply waste your storage space.


Set up the classifications and products in the Site System Role for the Software Update point.


Be sure to select, at a minimum the classifications Critical Updates, Security Updates, Update Rollups, and Updates.  Also, if your organization has Microsoft Surface devices, be sure to check the checkbox for Microsoft Surface drivers.  From the products be sure to select Windows 10, Windows 10 version 1903 and later, and Windows 10 LTSB (if you have LTSB in your environment).  Select any Windows Server versions that you have in your environment as well.  Finally use your software inventory information to select other products that exist in your organization.


See Software Updates Classifications and Products for more information. 


Automatic Deployment Rules


Now that you have your deployment collections created and your products selected it is time to create the deployments.  In order to fully automate the process you will create the following ADRs (again naming convention using least specific on left to most specific on right):


Here is the basic template for your ADRs.  The specifics for your six different deployment types are below after the template settings.


Basic Template

General:

Software Update Group = Create new

Enable = Enable the deployment after the rule is run

Deployment Settings:

Detail Level = Success and error messages

License Agreements = Automatically deploy all software updates found by this rule and approve any license agreements

Software Updates:

Software Updates Property Filters:

·         Date Released or Revised: Last 45 days

·         Is Deployed: No

·         Superseded: No

·         Update Classification: "Security Updates, Security Updates, Update Rollups, and Updates"

Click on the preview button to see what this will do before you continue.

Evaluation Schedule:

Run the rule on a schedule: Customize

·         Monthly

·         Every 1 month

·         The Second Tuesday

·         Be sure the time at the top is a time late enough in the day that Microsoft should have already released any updates by that time (suggest after 3pm PST)

Deployment Schedule:

Time based on: Client local time

Software Available time: As soon as possible

Installation Deadline: 2 days (this sets the deadline to Thursday at the time of day set in the evaluation schedule).

User Experience:

User notifications:  Show in software center and show all notifications

Deadline Behavior: 

Software Updates Installation: unchecked

System Restart (if required): unchecked

Deadline Restart Behavior:

Servers: Checked

Workstations: Unchecked

Alerts:

Generate an alert when this rule fails: checked

Generate an alert when the following conditions are met: checked

Client compliance below the following percent: 80

Offset from the deadline: 14 days

Operations Manager Alerts: leave both unchecked unless you have SCOM

Download Settings:

Using different distribution point:

Deployment Options: Do not install software updates (prevents network WAN swamping if a remote DP is down).

Default boundary group:

Deployment Options: Do not install software updates (prevents network WAN swamping if a remote DP is down).

Check both check boxes.  This will ensure that clients can get updates regardless of DP status and metered connections are not really a thing anymore.  If you have ADSL lines, satellite uplinks, or other metered connections then you might want to uncheck that box. 


ADR-Workstation-Test

General:

Description = Week 1 - Deploy to test, early adopters, and manual installations.

Collection = DEP - SU - Workstation Test

Deployment Schedule:

Software Available time: As soon as possible

Installation Deadline: 2 days (this sets the deadline to Thursday at the time of day set in the evaluation schedule).

Deployment Package: (use one of the two following choices)

No deployment package.  This is great for the modern workplace with many people mobile and/or working from home.  It removes the requirement for them to connect to the on-premises network (physically or via vpn) to get updates but you are still able to control the manifest of which updates they will receive.

Download Settings:

Check both check boxes.  This will ensure that clients can get updates regardless of DP status and metered connections are not really a thing anymore.  If you have ADSL lines, satellite uplinks, or other metered connections then you might want to uncheck that box. 


ADR-Workstation-Pilot

General:

Description = Week 2 - Deploy to pilot and dev.

Collection = DEP - SU - Workstation Pilot

Deployment Schedule:

Software Available time: 7 days

Installation Deadline: 0

Deployment Package: (use one of the two following choices)

No deployment package.  This is great for the modern workplace with many people mobile and/or working from home.  It removes the requirement for them to connect to the on-premises network (physically or via vpn) to get updates but you are still able to control the manifest of which updates they will receive.

Download Settings:

Check both check boxes.  This will ensure that clients can get updates regardless of DP status and metered connections are not really a thing anymore.  If you have ADSL lines, satellite uplinks, or other metered connections then you might want to uncheck that box. 


ADR-Workstation-Standard

General:

Description = Week 3 - Deploy to the entire organization.

Collection = DEP - SU - Workstation Standard

Deployment Schedule:

Software Available time: 14 days

Installation Deadline: 0

Deployment Package: (use one of the two following choices)

No deployment package.  This is great for the modern workplace with many people mobile and/or working from home.  It removes the requirement for them to connect to the on-premises network (physically or via vpn) to get updates but you are still able to control the manifest of which updates they will receive.

Download Settings:

Check both check boxes.  This will ensure that clients can get updates regardless of DP status and metered connections are not really a thing anymore.  If you have ADSL lines, satellite uplinks, or other metered connections then you might want to uncheck that box. 


ADR-Server-Test

General:

Description -=Week 1 - Deploy to test, early adopters, and manual installations.

Collection = DEP - SU - Server Test

Deployment Schedule:

Software Available time: As soon as possible

Installation Deadline: 0 days

Deployment Package: (use one of the two following choices)

If you do not already have a package for the year, create one.

Select a deployment package: Select your deployment package for the year

User Experience:

Deadline Restart Behavior:

Servers: Unchecked

Deployment Package: (use one of the two following choices)

If you do not already have a package for the year, create one.

Select a deployment package: Select your deployment package for the year

Download Settings:

Uncheck the check box for downloading from Microsoft.  You don't want servers going direct to Microsoft.  They should always be connected to your infrastructure.


ADR-Server-Pilot

General:

Description = Week 2 - Deploy to pilot and dev.

Collection = DEP - SU - Server Pilot

Deployment Schedule:

Software Available time: 7 days

Installation Deadline: 0 days

Deployment Package: (use one of the two following choices)

If you do not already have a package for the year, create one.

Select a deployment package: Select your deployment package for the year

User Experience:

Deadline Restart Behavior:

Servers: Unchecked

Deployment Package: (use one of the two following choices)

If you do not already have a package for the year, create one.

Select a deployment package: Select your deployment package for the year

Download Settings:

Uncheck the check box for downloading from Microsoft.  You don't want servers going direct to Microsoft.  They should always be connected to your infrastructure.


ADR-Server-Standard

General:

Description = Week 3 - Deploy to the entire organization.

Collection = DEP - SU - Workstation Standard

Deployment Schedule:

Software Available time: 14 days

Installation Deadline: 0 days

Deployment Package: (use one of the two following choices)

If you do not already have a package for the year, create one.

Select a deployment package: Select your deployment package for the year

User Experience:

Deadline Restart Behavior:

Servers: Unchecked

Deployment Package: (use one of the two following choices)

If you do not already have a package for the year, create one.

Select a deployment package: Select your deployment package for the year

Download Settings:

Uncheck the check box for downloading from Microsoft.  You don't want servers going direct to Microsoft.  They should always be connected to your infrastructure.


Software Update Groups and Software Updates Packages 


The Automatic Deployment Rules will create Software Update Packages and Software Update Groups.  The Software Update Group is basically a manifest of which updates should be accessible to a specific group of computers (the computers to which the SUG is deployed).  The Software Update Group does not actually contain the binaries/software of the update, that is in the Software Updates Package.


There is a major difference in how SCCM deals with Software Updates Packages and any other type of package.  You do not deploy Software Updates Packages themselves, but rather you deploy the Software Updates Group (the manifest).  When the client begins to apply updates it does not download the entire Software Updates Package but rather downloads only those updates from the Software Updates Package that apply to it.  That is the big difference, any other type of package must download the entire package.


This does not mean that you can allow your Software Updates Packages to grow to unlimited size.  The size of the Software Updates Packages will still contribute to slowing things down if they grow too large because they still must be transferred to Distribution Points and the clients must search through them for the updates.


It is recommended that you roll up your updates periodically into quarterly and/or yearly packages.  In the Automatic Deployment Rules section, all of the examples are using a yearly package so in that case you would need to create a new package each year.


You must maintain your Software Updates Groups and Packages by removing expired and superseded updates periodically.  Failure to do so will cause sometimes updates to fail.  See the Periodic Maintenance section for instructions on how to clean up your Software Updates Groups and Packages.


Client Settings


Below are the Client Settings that I most typically recommend.  Note that though these are typical they are not universal.  You must set these in a way that works for you and your business.  For example the BITS throttling window in these typical settings would not work at all for a global company that has almost equal usage 24 hours a day.


Background Intelligent Transfer Service (BITS)

Throttling window start time: 1hr prior to your normal start of business

Throttling window end time: 1hr after your normal start of business

Maximum transfer rate during throttling window (Kbps): 10 (this is so low because BITS is client side, not server side, so even this low one could theoretically swamp a WAN link).

Allow BITS downloads outside the throttling window: Allow

Maximum transfer rate outside the throttling window (Kbps): Unlimited

Client cache settings

Configure BranchCache: Yes

Enable BranchCache: No

Maximum BranchCache cache size (percentage of disk): 10

Configure client cache size: Yes

Maximum cache size (MB): 10240

Maximum cache size (percentage of disk): 5

Enable as peer cache source: Yes

Port for initial network broadcast (default UDP 8004): 8004

Port for content download from peer (default TCP 8003): 8003
Minimum duration before cached content can be removed (minutes): 1440

Client policy

Client policy polling interval (minutes): 60

Enable user policy on clients: Yes

Enable user policy requests from internet clients: Yes

Enable user policy for multiple user sessions: No

Cloud services

Allow access to cloud distribution point: Yes if CDP exists, No if it does not

Automatically register new Windows 10 domain joined devices with Azure Active Directory: Yes

Enable clients to use a cloud management gateway: Yes

Compliance settings

Enable compliance evaluation on clients: Yes

Schedule compliance evaluation: Every 1 Hour

Enable User Data and Profiles: No (but this is becoming more and more common)

Computer agent

User notifications for required deployments:

Deployment deadline greater than 24 hours, remind user every (hours): 24

Deployment deadline less than 24 hours, remind user every (hours): 4

Deployment deadline less than 1 hour, remind user every (minutes): 15

Default Application Catalog website point: Support ends for the application catalog roles with version 1910.

Add default Application Catalog website to Internet Explorer trusted sites zone: Yes

Allow Silverlight applications to run in elevated trust mode: No (This setting must be Yes for users to use the application catalog.)

Organization name displayed in Software Center: OrganizationName

Use new Software Center: Yes

Enable communication with Health Attestation Service: Yes

Install permissions: All Users

Suspend BitLocker PIN entry on restart: Always

Additional software manages the deployment of applications and software updates: No

PowerShell execution policy: Bypass

Show notifications for new deployments: No (this is the annoying "There is new software available")

Disable deadline randomization: No

Grace period for enforcement after deployment deadline (hours): 8

Enable Endpoint analytics data collection: No (if you are using Endpoint Analytics you likely are enrolling via Intune, not here).

Computer restart

Configuration Manager can force a device to restart: Yes

Specify the amount of time after the deadline before a device gets restarted (minutes): 120

Specify the amount of time that a user is presented a final countdown notification before a device gets restarted (minutes): 15

Specify the frequency of reminder notifications presented to the user, after the deadline, before a device gets restarted (minutes): 15

When a deployment requires a restart, show a dialog window to the user instead of a toast notification: Yes

When a deployment requires a restart, allow low-rights users to restart a device running Windows Server: Yes

Delivery Optimization

Use Configuration Manager Boundary Groups for Delivery Optimization Group ID: Yes

Enable devices managed by Configuration Manager to use Microsoft Connected Cache servers for content download: Yes

Endpoint Protection

Manage Endpoint Protection client on client computers: No/Yes depending on if company uses MEP

Install Endpoint Protection client on client computers: No/Yes depending on if company uses MEP

Allow Endpoint Protection client installation and restarts outside maintenance windows: Yes

For Windows Embedded devices with write filters, commit Endpoint Protection client installation (requires restarts): Yes

Suppress any required computer restarts after the Endpoint Protection client is installed: No

Allowed period of time users can postpone a required restart to complete the Endpoint Protection installation (hours): 120

Disable alternate sources for the initial definition update on client computers: No

Enrollment

Polling interval for mobile device legacy clients: 60

Polling interval for modern devices (minutes): 60

Allow users to enroll mobile devices and Mac computers: Yes

Enrollment profile:

Allow users to enroll modern devices: Yes

Modern device enrollment profile:

Hardware inventory

Enable hardware inventory on clients: Yes

Hardware inventory schedule: Every 1 Days

Maximum random delay (minutes): 90

Maximum custom MIF file size (KB): 512 (adjust as necessary if MIFs start failing due to size)

Hardware inventory classes: Keep defaults

Collect MIF files: Yes

Metered internet connections (these are not common)

Client communication on metered internet connections: Allow

Power management

Allow power management of devices: Yes

Allow users to exclude their device from power management: Yes

Allow network wake-up: Yes

Enable wake-up proxy: No

Remote tools

Enable Remote Control on clients, and Firewall exception profiles: Yes

Users can change policy or notification settings in Software Center: No

Allow Remote Control of an unattended computer: Yes

Prompt user for Remote Control permission: Yes

Prompt user for permission to transfer content from shared clipboard: No

Grant Remote Control permission to local Administrators group: Yes

Access level allowed: Full Control

Permitted viewers of Remote Control and Remote Assistance: <unconfigured>

Show session notification icon on taskbar: Yes

Show session connection bar: No

Play a sound on client: Beginning and end of session (default)

Manage unsolicited Remote Assistance settings: Yes

Level of access for Remote Assistance: Full Control

Manage Remote Desktop settings: Yes

Allow permitted viewers to connect by using Remote Desktop connection: Yes

Require network level authentication on computers that run Windows Vista operating system and later versions: Yes

Software Center

Select the user portal: Software Center

Select these new settings to specify company information: Yes

Company name: Enter the organization name that users see in Software Center.

Color scheme for Software Center: Click Select Color to define the primary color used by Software Center.

Select a logo for Software Center: Click Browse to select an image to appear in Software Center. The logo must be a JPEG, PNG, or BMP of 400 x 100 pixels, with a maximum size of 750 KB. The logo file name shouldn't contain spaces.

Hide unapproved applications in Software Center: No (hiding removes ability to request approval)

Hide installed applications in Software Center: No (hiding removes reinstall/repair ability)

Hide Application Catalog link in Software Center: Yes (Application Catalog is obsolete)

Software Center tab visibility: Leave Defaults

Configure default views in Software Center:

Default application filter: All

Default application view:  Tile view

Software deployment

Enable software inventory on clients: Yes

Schedule software inventory and file collection: Every 7 Days

Inventory reporting detail: Full details

Inventory these file types: .exe, .dll

Name: *.exe and *.dll

Location: %systemdrive%

Exclude encrypted and compressed files: Yes

Exclude files in the Windows folder: Yes

Collect files: None - use this very sparingly, it can really explode your storage usage.

Set Names: Leave default

Software Metering

Software inventory tells you which software exists on the computer. Software metering tells you when and how often the software is used.  The most common usage of metering is to recover licenses for software that is installed but not used.  To that end you don't need to create rules for every piece of software, only those where the usage actually matters.  For example usage of Notepad++ doesn't matter but usage of Visio does.  So don't kill yourself creating rules for everything, just the important items.

Enable software metering on clients: Yes

Schedule data collection: Every 7 days

§  Never enable the automatic rule creation as it just makes a mess.  Microsoft has never gotten this right since SMS 1.0.

§  Just use a wildcard for the version (*) as SCCM will automatically determine the version for you anyway and by using a wildcard you won't have to change your rule for every version.

§  Original file name is not necessary, ignore it.

§  Only use language if you have the same software in multiple languages, otherwise use a wildcard (*).

§  Select "All Clients" for "Apply this software metering rule to the following clients".  If you aren't wanting to meter your clients then why are your clients then why are you creating the rule?

Software updates

Software update scan schedule: Every 1 Day

Schedule deployment re-evaluation: Every 7 Days

Allow user proxy for software update scans: No

When any software update deployment deadline is reached, install all other software update deployments with deadline coming within a specified period of time: Yes (this helps to reduce the number of times per month that you irritate your users)

Period of time for which all pending deployments with deadline in this time will also be installed: 7 Days (only irritate the users for software updates once per week)

Allow clients to download delta content when available: Yes (reduces the amount of data used to download updates)

Port that clients use to receive requests for delta content: 8005 (default)

If content is unavailable from distribution points in the current boundary group, immediately fallback to a neighbor or the site default: No

Enable management of the Office 365 Client Agent: Yes

Enable installation of software updates in "All deployments" maintenance window when "Software Update" maintenance window is available: No (we prefer keeping these deployments segregated so that if there is a problem it is easier to troubleshoot)

Specify thread priority for feature updates: Not Configured

Enable third party software updates: Yes

Enable Dynamic Update for feature updates: Yes

State Messaging

State message reporting cycle (minutes): 15 minutes (default)

User and device affinity

User device affinity usage threshold (minutes): 2880 minutes (default)

User device affinity usage threshold (days): 30 days (default)

Automatically configure user device affinity from usage data: Yes

Allow user to define their primary devices: Yes


Periodic Maintenance


In order to keep your windows updates infrastructure healthy there is some maintenance that you should perform periodically.  How frequently you do these things is up to you but quarterly is recommended and no less frequently than annually.


Remove expired and superseded updates from software updates groups -

1.       Look at the list of Software Updates Groups for any that have a yellow icon, double-click on the software update group to see its "Membership" (all software updates that are included in the SUG).

2.       If the columns are not already visible, add columns for Expired and Superseded in your console view.

3.       Sort the updates by "Expired"

4.       Multi-select all expired updates (hold shift and click on them).

5.       Right-click on any selected update and select "Edit membership" from the context menu.

6.       Remove the updates from all software updates groups

7.       Sort the updates list by "Superseded" and repeat steps 4-6 for the superseded updates.

8.       Repeat steps 1-7 until there are no more SUGs with yellow icons.


Roll up updates into quarterly/annual Software Updates Packages

1.       adsf